Step-by-Step Guide to Git, Version Control && GitHub for Tech Newbies
A complete guide to everything Git and GitHub

I am a developer from Nigeria. I am quite passionate about writing and web development. I look forward to sharing my knowledge and documenting my process through Technical writing.
Let's learn and grow together!
What is Version Control?
Version control, also known as source code, is the practice of tracking and managing changes made to files or codes.
Version Control Systems
Version control systems are software tools that record changes made to files or codes over time. This allows you to access a specific version of that file or code later on. Git is one of the most popular version control systems.
What is Git?
Git is a free and open-source distributed version control system. Git is used for
- Tracking changes made to code or file.
- Tracking who made the changes.
- Coding collaboration with other programmers.
You first need to install git into your computer to access its features. Visit their official website and follow the provided steps to download.
Some people often wonder about the difference between Git and GitHub
The simplest way to explain the difference between Git and GitHub is that
- Git is a version control system downloaded on your computer; when initialized helps you track changes. While
- GitHub is a company that provides hosting services for version control.
What is GitHub?
GitHub is code hosting platform for version control and collaboration. GitHub allows you to collaborate with other programmers or your team from anywhere. Follow the provided steps and create an account on their official website
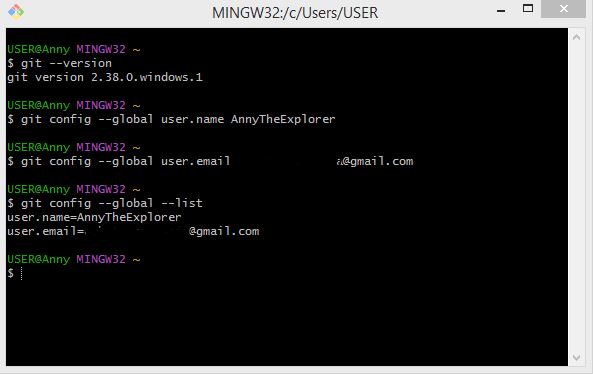
How to setup git after installation and check if it's properly installed
- Search for Git bash on your computer
- Run the following commands
git --version
git config --global user.name JohnDoe
Edit JohnDoe with your username on GitHub
git config --global user.email johndoe@web.com
Edit the email with yours
git config --global --list
This command will show you a list of your details
How to initialize a git repository
Initializing a repository creates a subdirectory called . git that contains the files needed to start tracking the changes made by Git.
###To initialize a git repository using the git init command in VS code (a code editor)
- Go to the files terminal
- Run the following commands to initialize a single file
git init
git status
This command tells the status of the file at all times.
git add index.html
This command tells Git to start tracking changes made to the file
However, to initialize multiple files within a folder at once. Use the following commands
git init
git status
git add .
What is Git Commit?
Git commit keeps track of your progress. It also helps you go back to a particular stage of the file or code later on.
Git commit works as a precaution against future errors or bugs. Therefore, it is very important to stage your work after any modification, as you keep working. This way you can just reference a particular stage and start from it again. Use the following command
git add .
git commit -m 'initial commit'
Use a descriptive message to describe the point of progress, like "initial commit, add login button, etc."
What is Git Branch?
Git branch allows you to make different copies of the source code or file that you are working on. Simply put, Git branch allows you to have different copies of a particular file, code, or website.
For instance, while working on a landing page for a company, they can't decide if they prefer the rounded button to the squared button. As the developer, you can add a branch to make a copy of the code to avoid changing the master branch (which has the rounded button). This way you can implement the squared button on the duplicated version of the project.
When the company eventually makes a choice and decide to go with one of the buttons, you can simply switch over to the desired branch. Use the following command to duplicate your file and create your branch
git branch develop
git branch
The command below will move you to a particular branch from another
git checkout develop
The above command will automatically move you to the duplicated branch (which is "develop" in this case) or any branch of your choice. Interchange "develop" with the name of your desired branch.
Any modifications to the branch, when committed, will be made strictly to the selected branch.
And if for some reason you don't want to work with the modified branch, you can always return to the main branch using the command git checkout main
Collaborating & Hosting your codebase on GitHub
How to Push Projects to GitHub
Click on "New"

Enter a repository name, for example, "First-landing-page"
- Leave it public (Very important)
You can enter a description, if you wish to.
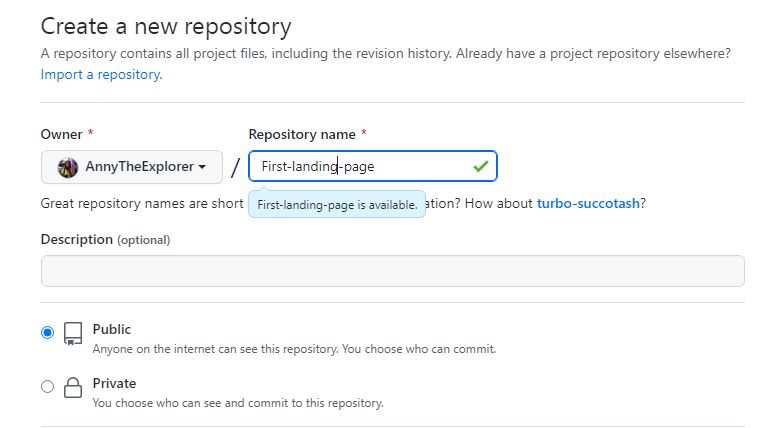
You can choose to forgo adding a README file
- Go with the other default settings
- Create a repository
When you follow the above steps, the created repository will become a blank repository on GitHub. Thus, to initialize a repo, GitHub gave 3 options to do so
- Create a new repository on the command line
- Push an existing repository from the command line
- Import code from another repo
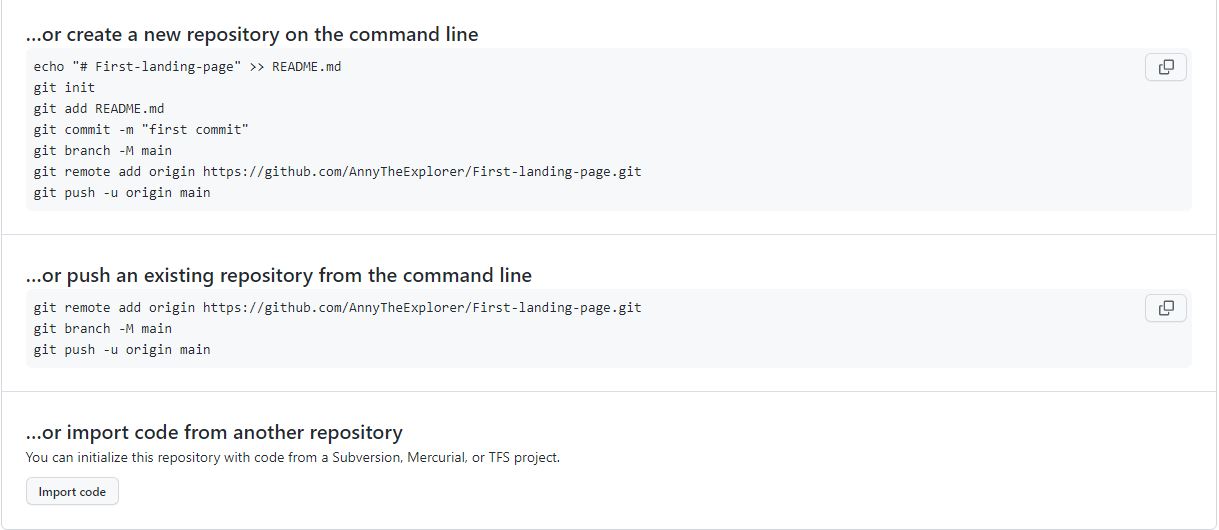
You already created a repository if you followed the steps provided in this article. So, let's initialize your repo using the second option - push an existing repo from the command line.
To push an existing repo from the command line, use the following commands as given
git remote add origin "url"
git remote -v
git branch -m main
git push -u origin main
Head over to GitHub and refresh to see your files in your new repo. Note that you can push as many branches as possible to your online repository.
How to Pull Projects from GitHub
The idea of GitHub pull is to be able to pull codes from online to your local workplace. In a situation where you are collaborating with others on a project, the pull command is similar to the push command.
- Open your system command line, or open your "terminal" on VS code on the branch "main"
git pull origin 'develop'
develop as used in the above command should be the name of the branch you want to make.
How to Clone Existing Projects from GitHub
Cloning makes it possible to copy another person's project into your system. Especially while contributing to a project or collaborating with others on a project.
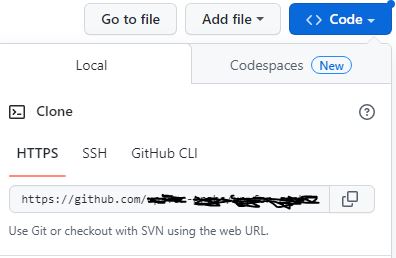
- Head over to the repository's main branch
Click the code dropdown

Copy the "Https" command link
Create an empty folder in your local directory
- Open a terminal to the folder
- Enter the following command
git clone 'paste copied URL'
Keep in mind that the URL must end with
.gitfor the cloning to be successful.
After cloning, the files will be added to your empty folder. To access your cloned files in your code editor,
- Open folder
- Open terminal
- Enter the command
git status
When you clone a repository, there's no need to initialize Git because it has been initialized by default. So, you can now create a new branch and start making your changes or contributions. Then "commit" and "push" online when necessary.
What is Git/GitHub Workflow?
It is basically a group of practices designed to work well with Git and GitHub.
- When you are working on a Git repository, It is advisable to not work from your main branch.
- After cloning a repo, the first thing you should do is to check out from the main branch to a duplicated branch.
Below is a shortcut to create a new branch, and checkout from "main" at once.
git checkout -b 'name of branch'
Substitute 'name of branch' with the actual name of your branch, it can be something like "develop"
Additionally, always remember to commit changes once you reach a reasonable milestone. Don't wait to get everything done before you "commit" to avoid unrecoverable bugs and errors.
Committing changes helps you access another version of the file much later.
git add .
git commit -m 'add footer'
Substitute 'add footer' with a descriptive name for changes made.
How to create a pull request (PR) on GitHub
Pull request is all about requesting for your code to be merged to another branch online. Simply put, you are requesting for your code to be pulled into a different branch.
- Go to the repository you pulled from
- Click on compare and pull request, or click on the pull request tab and select new pull request.
Choose base:main, and compare:'file name'
Substitute 'file name' with the name of your file

Enter a name for the pull request.
- You can add descriptions if you must.
- Click Create pull request.
- You can also add a maximum of 15 reviewers (People you work with or the owner of the repo) by clicking "Reviews."


